E-learning in analysis of genomic and proteomic data 2. Data analysis 2.2. Analysis of high-density genomic data 2.2.1. DNA microarrays 2.2.1.1. Basic principle of DNA microarrays
Basic principle of DNA microarrays
The basic principle of DNA microarray experiment can be described in following steps:
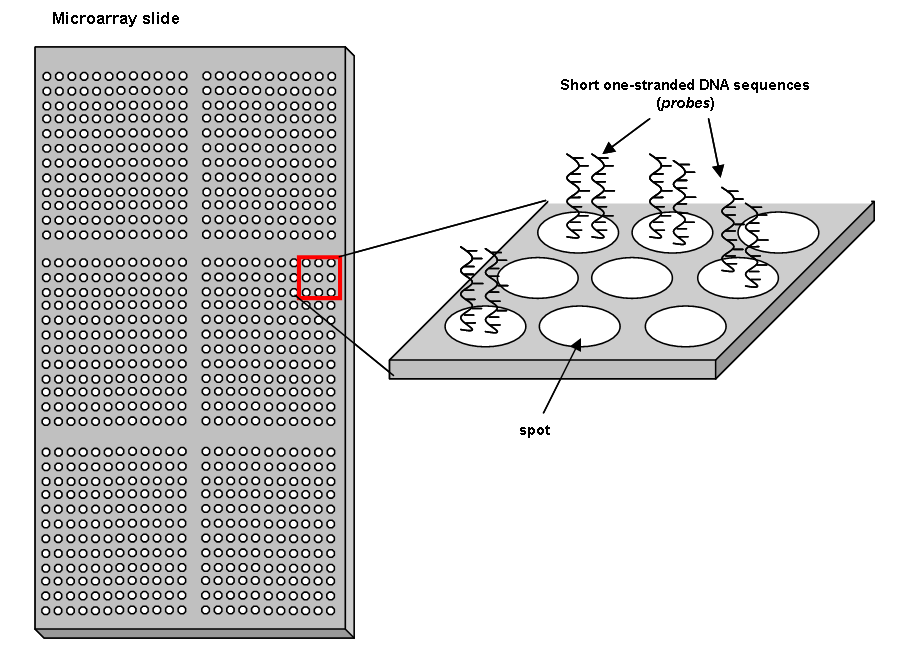
- Microarray slide production: Short fragments of DNA (oligonucleotides) of known sequence called probes, designed to react with target DNA fragments of the samples of interest are immobilized in microscopic areas (spots) on the solid surface. Spots are organized on the surface in a regular manner with even distances in the form of matrix of tens/hundreds of columns and tens/hundreds of rows. Probes are usually one-stranded (see the figure below):
- Sample preparation
First, the molecules of interest (DNA or mRNA) are extracted from the sample to be analyzed. The mRNA is transcribed into cDNA and amplified using RT-PCR. The DNA is amplified by PCR. The amplified DNA (cDNA) is labelled by a fluorescent dye (most commonly the Cy3 or Cy5). This is called the direct labelling. In the indirect labelling,a reactive group, usually a primary amine, is incorporated into the cDNA first, and the Cy3 or Cy5 is then coupled to the cDNA in a separate reaction - Hybridization
The two strand DNA (cDNA) molecule is denatured by heating to about 100°C. At this temperature, the hydrogen bonds that hold the complementary base pairs and thus the helix strands together are disrupted and the helix rapidly dissociates into two single strands. Under specific conditions, the DNA denaturation is reversible. The single stranded DNA strains bind with the complementary strains, creating a single two-strand hybrid (duplex). This process is called DNA renaturation or hybridization. Fluorescently labelled DNA (cDNA) fragments of the sample are hybridized with probes on the microarray slide. Denaturated (one-stranded) molecules of sample DNA (cDNA) bind to probes with complementary sequences, creating two stranded hybrids (one strain formed by probe, second strain formed by labelled target DNA). The properties of fluorescent colours allow for detection of these complexes using laser-based scanners. The laser of a certain wavelength excites the fluorescent dye present at each spot of the microarray and the dye emits a radiation that is captured by a photomultiplier tube. The amount of signal emitted is directly in proportion to the amount of dye at the spot on the microarray and these values are obtained and quantitated on the scanner, producing thus an image of the microarray slide.
Each fluorescent dye is excited under different UV wavelengt, a property that allows to compare two samples on the same microarray slide. This is used in two-channel DNA microarrays. Here the DNA of one sample is labelled by one fluorescent dye (e.g. Cy3, green), the DNA of the other sample is labelled by another fluorescent dye (e.g. Cy5, red). Both samples are than hybridized onto microarray slide, where they competitively bind onto probes with complementary sequences. The scanner captures the image for each channel (fluorescent dye) individually and the two images are merged together later in the process of the image analysis.
The following videos illustrate the process of the DNA microarray experiment: MAXANIM
YOUTUBE animation
The following video shows the principle of different types of microarrays (including protein arrays)
YOUTUBE differenes between arrays